- Henna Powder Manufacturer & Exporter in India
- +91 9910415530
- online@nmpudhyog.com

15 Easy Mehndi Cone Designs for Hands: Simple, Small & Arabic Styles
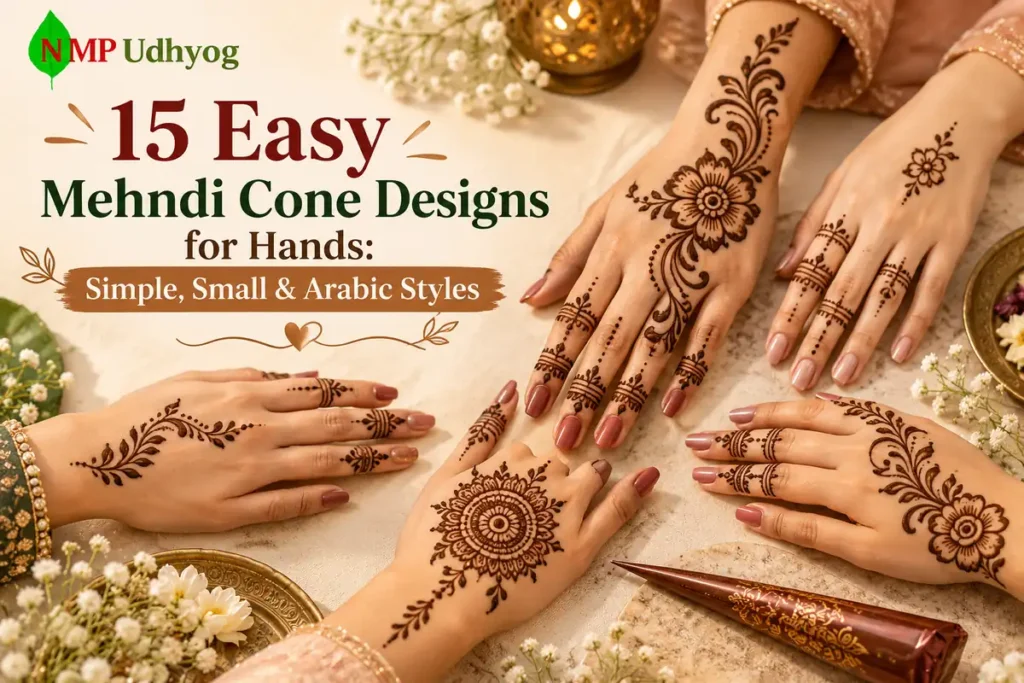
Mehndi cone designs are decorative patterns created by applying henna paste through a cone. From small flowers and leafy vines to Arabic patterns, these designs can be drawn on the hands, fingers, and wrists. Beginners can start with simple shapes before trying detailed artwork. In this guide, we explore 15 easy mehndi cone designs, including small, simple, and beautiful styles for different occasions. You will also learn basic drawing techniques to create neat patterns using a mehndi cone.
Simple Mehndi Cone Designs for Beginners
Simple cone designs are ideal for beginners who want to practise drawing with henna without creating complicated patterns. These five designs use basic lines, dots, circles, and curves that are easy to control.
1. Single Flower Mehndi Design
Start by drawing a small circle in the centre of your palm. Add five rounded petals around it, keeping their sizes similar. Complete the flower with tiny dots or leaves along the edges. This design is suitable for first-time practice.
2. Dotted Chain Mehndi Design
Create a straight or curved line of small dots along your finger or wrist. Keep equal spacing between them for a balanced appearance. Add slightly larger dots at regular intervals to make the pattern more decorative.
3. Simple Leafy Vine Design
Draw a gently curved line from your wrist towards your hand. Add small pointed leaves on alternating sides. Keep the vine thin and leave enough space between leaves. This creates an elegant design without requiring detailed filling.
4. Small Heart Mehndi Design
Draw a small heart on your palm or near your thumb. Add a few dots or curved lines around it. This minimal pattern works well for beginners practising smooth cone movements.
5. Basic Circular Mandala Design
Draw a small circle in the centre of your palm. Surround it with rounded petals and tiny dots. Keep the design symmetrical for a neat finish.
Easy Small Cone Designs for Hands
Easy small cone designs are perfect for anyone who prefers minimal mehndi patterns. These designs require less space and can be applied to fingers, palms, or wrists without covering the entire hand.
6. Finger Ring Mehndi Design
Draw two thin curved lines around the base of your finger to create a ring shape. Add tiny dots or petals between them. This simple design gives your finger a jewellery-inspired appearance.
7. Tiny Wrist Bracelet Design
Create two parallel lines around your wrist and connect them with small flowers or dots. Keep the spacing even. This pattern resembles a delicate bracelet and looks beautiful without additional details.
8. Mini Floral Trail Design
Draw three small flowers diagonally across your palm. Connect them using thin curved lines and tiny leaves. Leave some empty space between the flowers to maintain a clean appearance.
9. Small Back-Hand Motif
Start with a small circle on the back of your hand. Surround it with four petals and add a few dots. This design is quick to draw and suitable for everyday occasions.
Arabic Mehndi Cone Designs
Arabic cone designs are known for flowing floral patterns, curved vines, and attractive spaces between motifs. Unlike heavily filled traditional designs, Arabic mehndi often uses bold outlines and connected decorative elements that beginners can practise easily.
10. Diagonal Arabic Vine Design
Draw a curved line diagonally from your wrist towards your index finger. Add small leaves and flowers along the line. Keep the spaces between elements open for a balanced Arabic-style pattern.
11. Bold Arabic Flower Design
Start with a large flower on the back of your hand. Draw rounded petals using slightly thicker outlines. Add small leaves extending towards your fingers. Leave the surrounding area empty to highlight the flower.
12. Flowing Paisley Mehndi Design
Draw a curved teardrop shape near your wrist. Fill it with small dots and curved lines. Extend a thin leafy vine from its pointed end to create an elegant, flowing design.
13. Half-Hand Arabic Floral Trail
Begin with a flower near the wrist and connect it to smaller flowers extending towards one finger. Add curved leaves between the flowers. Keep the opposite side of your hand mostly uncovered.
Beautiful Mehndi Cone Designs for Special Occasions
Beautiful cone designs are ideal for weddings, festivals, Eid, and family celebrations. These patterns combine floral details with decorative elements while remaining manageable for beginners.
14. Floral Bracelet Mehndi Design
Draw a curved bracelet-shaped band around your wrist. Add small flowers along the band and extend delicate leafy vines towards your fingers. Use tiny dots between the flowers to create an elegant jewellery-inspired pattern.
15. Decorative Mandala Mehndi Design
Start with a circle in the centre of your palm. Add layers of petals, curved lines, and small dots around it. Extend a few leafy branches outward for a beautiful, balanced design suitable for festive occasions.
How to Make Simple Mehndi Designs Using a Cone
Creating easy mehndi designs with a cone becomes simpler when you understand basic handling techniques. Beginners should practise controlling the cone before attempting detailed patterns.
Step 1: Prepare Your Hands
Wash your hands and dry them completely. Avoid applying oils or lotions before starting, as they may affect how the paste adheres to your skin.
Step 2: Hold the Mehndi Cone Correctly
Hold the cone like a pen, keeping its tip close to your skin. Apply gentle, consistent pressure to release the paste smoothly without creating uneven lines.
Step 3: Practise Basic Shapes
Before drawing on your hands, practise making dots, straight lines, circles, and curved strokes on paper. These shapes form the foundation of most simple mehndi cone designs.
Step 4: Start With a Small Pattern
Choose an easy design, such as a flower or leafy vine. Draw the main outline first, then add petals, dots, and other decorative details gradually.
Step 5: Allow the Mehndi to Dry
Once the design is complete, keep your hand still and allow the paste to dry naturally. Avoid touching or rubbing the pattern while it is wet to prevent smudging.
With regular practice, beginners can gradually improve their cone control and create more detailed designs.
Tips for Choosing a Mehndi Cone
Choosing the right mehndi cone helps beginners create smooth, detailed patterns. Consider these factors before starting:
- Paste Consistency: Choose a cone with smooth, lump-free paste that flows evenly without being too runny or thick.
- Cone Tip Size: A fine tip works well for small flowers, dots, and delicate lines, while a slightly wider opening suits bold patterns.
- Ingredient Safety: Check the ingredient list and avoid black henna cones containing para-phenylenediamine (PPD), which can cause serious skin reactions.
- Cone Freshness: Check the product’s storage instructions and expiry date before use.
Common Mistakes Beginners Should Avoid
When practising easy mehndi cone designs, small mistakes can affect the appearance of the finished pattern. Understanding these common issues can help improve your technique.
- Uneven Lines: Moving the cone too quickly or changing hand position frequently can create irregular strokes. Practise drawing slowly and steadily.
- Excessive Pressure: Squeezing the cone too hard releases unnecessary paste, making lines thicker than intended. Maintain gentle, consistent pressure.
- Poor Spacing: Placing flowers, leaves, or dots too close together can make simple patterns appear crowded. Leave enough space between decorative elements.
- Smudging Wet Mehndi: Touching the design before the paste dries can spoil its shape. Keep your hand steady and avoid contact with clothing.
Regular practice with basic shapes can improve accuracy and make detailed designs easier to create.
How to Care for Fresh Mehndi Designs
Proper aftercare helps natural mehndi develop its colour and keeps the design looking neat.
- Allow Proper Drying: Let the mehndi paste dry naturally without touching or rubbing it.
- Avoid Water Initially: After removing the dried paste, avoid unnecessary washing for several hours.
- Remove Paste Gently: Gently scrape off the dried henna instead of washing it away immediately.
- Allow Colour Development: Natural henna initially leaves an orange stain that gradually darkens to reddish-brown over the next 24–48 hours.
The final colour depends on paste quality, skin characteristics, and application conditions.
Frequently Asked Questions (FAQs)
1. What are the easiest mehndi cone designs for beginners?
Small flowers, leafy vines, dotted chains, hearts, and simple mandalas are among the easiest mehndi cone designs for beginners. These patterns use basic shapes and require minimal detailing, making them suitable for practising cone control and drawing techniques.
2. How can I draw small mehndi designs using a cone?
Start with a small pattern, such as a flower or leaf. Hold the cone like a pen and apply gentle pressure while drawing. Create the main outline first, then add dots, petals, or curves to complete the design.
3. Which Arabic mehndi designs are easiest to create?
Diagonal floral vines, simple paisley patterns, leafy trails, and single Arabic flowers are relatively easy for beginners. These designs use flowing lines and open spaces, making them less complicated than densely filled traditional mehndi patterns.
4. How do I control a mehndi cone for thin lines?
Use a cone with a fine opening and hold it comfortably near the tip. Apply light, steady pressure while moving your hand slowly. Practising straight lines, curves, and dots on paper can help improve accuracy before applying mehndi.
5. How long does natural mehndi take to develop its final colour?
Natural henna usually produces an orange stain after the dried paste is removed. The colour gradually deepens over approximately 24–48 hours. The final shade varies depending on the henna preparation, application time, skin characteristics, and aftercare.
Conclusion
Simple, small, and Arabic mehndi cone designs offer beginners different ways to create beautiful hand patterns. With regular practice, proper cone handling, and suitable aftercare, even basic designs can look elegant. The quality of henna also matters, making reliable sourcing from a henna powder exporter an important consideration for businesses preparing natural mehndi products.